
When you need your own label format
Built-in formats cover the standards: GS1, PTI, SSCC and the retailers listed in the Producepak app guide. But fresh produce businesses regularly need labels that no standard covers. A farm shop wants a branded label with a story about the grower. An export market requires text in another language. A food service customer wants its own item numbers printed large. A packhouse wants grower names on bin labels big enough to read from a forklift. A new certification scheme needs its mark on the carton.
For these, the Producepak label designer lets you create new labels and documents at any time. The Producepak app guide describes it in exactly those words, alongside a comprehensive selection of built-in fresh produce and food industry labels, delivery dockets, export documents and certificates.
The building blocks of a label format
Every label format, however simple or complex, is made from a small set of element types. Understanding them makes designing a format straightforward.
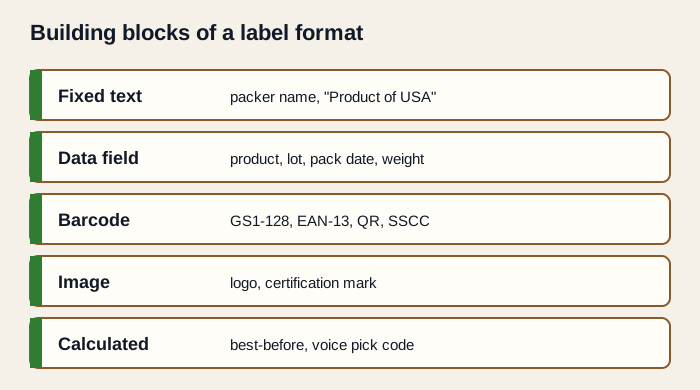
Fixed text
Text that is the same on every label of this format: headings, the packer's name, storage instructions, "Product of USA" for a format used only for US-grown product.
Data fields
Placeholders filled from Producepak when the label prints: product description, variety, size, grade, net weight, lot, pack date, customer, order number, grower. Data fields are what make a label accurate, because the value comes from the record instead of being typed.
Barcodes
Machine-readable codes built from data fields: GS1-128 for case and pallet data, EAN-13 or UPC for retail units, QR codes for links or richer data, and the SSCC for pallets.
Images
Logos, certification marks, retailer marks where the customer requires and supplies them, and simple pictograms.
Calculated values
Values derived from other data: a best-before date set a number of days after the pack date, a voice pick code calculated from GTIN, lot and date, or a check digit.
Designing a format, step by step
The exact screens in the designer are best seen in a demo, but the process of designing a good produce label is the same whatever the tool.
- Start from the requirement. Collect the customer's specification, an approved sample, or your own brief. Note the label size, the printer it will be printed on and where the label goes on the pack.
- Set the size. Match the physical label stock exactly, including any gaps between labels.
- Place mandatory elements first. Product, origin, packer, lot, date and barcode. Position them as the specification requires.
- Connect data fields. Link each variable element to the matching Producepak field rather than typing sample values.
- Add barcodes. Choose the symbology and connect it to the data it encodes; make sure human-readable text matches.
- Add images and fixed text. Logos, certification marks and instructions.
- Test print. Print on the actual printer and stock, scan every barcode and compare against the specification.
- Link and approve. Link the format to the customer and products it applies to, and record who approved it.
Design rules that keep labels readable
| Rule | Why it matters |
|---|---|
| Keep barcodes away from label edges | Scanners need a clear quiet zone either side of the bars |
| Print barcodes at 300 DPI or higher | The Producepak guide gives 300 DPI as the minimum for barcodes |
| Use high contrast: black on white | Coloured backgrounds and red bars reduce scan rates |
| Make the product name the largest text | Pickers and receivers identify product by eye first |
| Use a consistent date format | Mixed formats such as 04/10 and 10/04 cause misreads |
| Avoid tiny fonts for mandatory text | Regulators and customers may set minimum heights |
| Leave room for long product names | Data fields vary in length; test with the longest name |
Formats for every level of packaging
Retail unit labels
Labels on bags, clamshells, punnets and trays that a shopper sees. Often include a retail barcode, a product name, weight, origin and sometimes a price or best-before date.
Case labels
Labels on cartons and crates for distribution, usually GS1-based. Many customers start from PTI and add their own elements.
Pallet labels
GS1 logistics labels with SSCC. Retailers often specify the layout precisely.
Tote and bin labels
Internal labels for receival and storage. Design for readability at a distance and durability in the cool room.
Documents
The designer also covers documents: delivery dockets, export documents and certificates are listed in the Producepak guide alongside labels.
Managing many formats
A supplier to several retailers and food service customers can quickly accumulate dozens of label formats. Without discipline, formats are copied, tweaked and duplicated until nobody is sure which is current.
- Name formats clearly. Include customer, label type and size, for example "Customer A, case, 4x3".
- Keep one current version. When a specification changes, update the format rather than creating a copy.
- Record approval. Note who approved each format and against which version of the specification.
- Review annually. Retailers update supplier manuals; check formats against current requirements once a year or when notified.
- Retire unused formats. Remove formats for customers you no longer supply.
Designer or AI?
The label designer gives you complete control, which is ideal for your own brand and for formats you know well. For customers who send a detailed specification, building the format by hand takes time and is prone to small errors: a field in the wrong place, a font slightly too small, a barcode with the wrong content. That is where AI label generation helps. Pak-Bot reads the specification and generates the format, and you use the designer only if you want to fine-tune the result.
| Use the designer when... | Use Pak-Bot when... |
|---|---|
| You are creating your own brand or market label | A customer sends a written specification or sample label |
| You want to adjust a built-in format slightly | You have several new customer formats to set up quickly |
| The label is internal, such as a bin or tote label | A customer has changed their specification |
Practical examples
Farm-gate brand label
Your logo, product name in large type, the farm's story in two lines, origin, net weight and a QR code linking to your website.
Export carton label
Product, class and origin in the language of the destination market, exporter details and a GS1-128 barcode.
Large-print bin label
Grower name, block and harvest date in type big enough to read from a forklift, plus a barcode for receival scanning.
Food service case label
The customer's item number in large type, product, pack size, lot, pack date and use-by date.
Worked example: a food service case label
Suppose a food service distributor asks for a case label with its own item number in large type, the product name, pack size, lot, pack date and a use-by date set seven days after packing, plus a GS1-128 barcode. Here is how the format might come together in the designer.
- Size: 4 x 3 inch label stock, matching the line printer.
- Top band: the customer's item number as a data field, in the largest type on the label.
- Product block: product description and pack size as data fields.
- Dates: pack date as a data field; use-by as a calculated value of pack date plus seven days.
- Traceability: lot number as a data field, printed both as text and in the barcode.
- Barcode: GS1-128 encoding GTIN and lot, with matching human-readable text.
- Fixed text: packer name and location, "Keep refrigerated".
- Test: print with the longest product name in the range to check nothing overflows, then scan.
Once approved, the format is linked to that customer. Every case packed for them prints with the correct item number, dates and lot, and nobody needs to touch the layout again unless the customer changes its requirements.
Testing a new format properly
A format that looks right on screen can still fail on the line. Test each new format against these points before it goes into production:
| Test | How |
|---|---|
| Longest values | Print with the longest product name, largest weight and longest customer code |
| Barcode scan | Scan every barcode with a handheld scanner and compare the data |
| Production printer | Print on the actual printer, not an office printer |
| Real stock | Use the label stock that will be used in production |
| Cold test | Leave a labelled case in the cool room overnight and check adhesion and print |
| Customer comparison | Lay the test label beside the customer's sample |
Labels for export markets
Export labels often need text in the language of the destination market, different date formats, importer details and market-specific marks. The designer lets you create a separate format for each market, so the right text and layout print automatically for export orders. Keep the GS1 barcode and lot code consistent across markets so traceability is the same wherever the product goes.
Designing for cold, wet and busy conditions
Produce labels are read in poor light, at a distance, on damp cartons, by people in a hurry. Design for those conditions rather than for a screen. Use bold, simple fonts. Keep the most important information, usually the product and the customer item number, in the largest type and the same position on every format. Leave white space around barcodes. Avoid fine lines and light colours that fade or smear. If a label will be read from a forklift, test it from a forklift. Small design choices like these have a large effect on how often labels are misread on the floor and at the customer's dock.
Who should use the designer
Label design works best in the hands of one or two trained people rather than everyone on the packing floor. Those people build and approve formats; packing staff simply print them. Restricting design access prevents well-meaning edits on a busy day that drift a format away from the customer's specification. When a change is needed, the request goes to the designer owner, who updates the format, tests it and records the change. Combined with Pak-Bot for customer specifications, this keeps the number of people who need design skills small while every station still prints the right label.
Label designer questions
Can I create my own label formats in Producepak?
Yes. The Producepak app guide states that you can create new labels and documents at any time with the built-in designer.
Can the designer create documents as well as labels?
Yes. Delivery dockets, export documents and certificates are listed alongside labels in the Producepak guide.
Do I have to use the designer for customer labels?
No. You can give a customer's label specification to Pak-Bot and Producepak can generate those labels without using the designer.
What resolution should labels be printed at?
300 DPI or higher for barcodes, according to the Producepak guide.